Monday, November 23, 2015

Flash Sale Today at Stampin' Up!

Online Extravaganza kicks off today with a 24 Hour Flash Sale!

Stampin' Up!


Today only you can buy 3 packs of select Designer Series Paper and get 1 free! 
The Gift Box Punch Board and Envelope Punch Board are also 30% off TODAY ONLY!

See all the 24 hour flash sale items.

Here's a list of all the additional items on sale, 20-50% off, through November 30!
While you're shopping, don't forget to check out the Weekly Deals and Clearance Rack too.

Place your order online and have it shipped directly to you.Then craft away!


Wednesday, November 18, 2015

Visit the Turkeys

Craft Fair in Watertown, WI this weekend!

These little turkeys will be there, will you?


Where:
Watertown Turner Hall
301 S Fourth Street
Watertown, WI 53094

When:
Sunday, November 22, 2015
9:30am - 3:00pm

What:
One of Watertown's longest running craft fairs! Two floors of crafts, collectibles, and more from some of your favorite local crafters as well as some new ones. Fresh decorated wreaths, snowman crafts, rustic decor, crochet and knit items, jewelry, and soooo much more.
Pampered Chef, Thirty-One, Norwex, Essential Oils, Tupperware, Scentsy, Jamberry, and Stampin' Up! 
*FREE ADMISSION
*FREE DOOR PRIZE DRAWINGS 
*Kitchen serving breakfast, lunch, and lots of other goodies

Come and visit us!

Wednesday, August 12, 2015

Cherry On Top

Shoe Box Swap

Birthday card using Make a Wish stamp and Cherry on Top DSP

Gather To Stamp

Last month at the Song of My Heart Stampers demonstrator meeting we had a shoebox swap! If you don't know what that is, it's a get-together where each participant designs a card and cuts all the pieces needed to create their design. Then the cut pieces, along with stamps, ink and embellishments are placed in a shoebox or other container. Everyone goes around the tables and creates the project in each box. It's so much fun!

At this gathering, the Stampin' Up! Cherry On Top DSP (Designer Series Paper) stack and coordinating Washi Tape was a big hit! It was used on a whole lot of projects, some of which I'll share in just a moment. But first, I'd like to show you my project and give you a few measurements in case you'd like to make one of your own.

Make a Wish With Cherry On Top

Let's start off with the Make a Wish greeting which comes from the Perfect Pennants stamp set. This set has a couple of pennants and sentiments along with a heart and a star and can be used for many occasions in addition to birthdays. Here I stamped it with Bermuda Bay ink (one of my favs) and punched it out with the Note Tag Punch. Easy!

The card base is a standard 4-1/4" x 11" piece of Soft Sky cardstock, folded in half to make a 4-1/4" x 5-1/2" card. On top of the Soft Sky is a layer of 3-1/4" x 4-1/2" Crushed Curry cardstock.

Next, there are two small pieces, 1-1/2" x 3", of Cherry on Top DSP, which comes in a convenient 6" x 6" stack. You may want to bundle that with the coordinating cardstock pack so that you have all the bright pretty colors to play with!

To finish off the card, I punched a tag from Cucumber Crush cardstock (included in the coordinating cardstock pack) with the Scalloped Tag Topper Punch. I used two pieces of Cherry On Top Washi tape to coordinate with the rest of the card. The Make a Wish sentiment is adhered to the tag with Stampin' Dimensionals. Then add a piece of White Organza ribbon and tie it with Gold Baker's twine. Adhere the tag to the card and you're done! Woohoo! The Scalloped Tag Topper Punch is on the Weekly Deals this week. See all the Stampin' Up! Weekly Deals.


If you need any of these products, be sure to click the links above to go right to the online store. But, before you go, here are a couple of other samples designed by fellow Song of My Heart stampers with the Cherry On Top paper.

Black card base with Cherry on Top banners and a cheery cupcake.
 
I love these ovals that are off-center with a cupcake on top!
 
Friend card with Cherry On Top banners. Stamp is colored with markers.
 
This one was fun to add a little color to the stamp with markers. The card base is one of the new in-colors - Watermelon Wonder.
 
Fancy Fold card using Cherry On Top paper and lots of bright colors.
 
Fancy Fold card - This one was a little hard to photograph to show the whole card, so scroll down to see the front and the inside. So bright and cheery, and it uses several different coordinating patterns from the paper stack!


Fancy Fold Cherry On Top card - front view
Front

Fancy Fold Cherry On Top card - Inside
Inside
 
 That's it for today! Hope you're having a happy life! 

Wednesday, July 22, 2015

June 2015 Paper Pumpkin

 June Paper Pumpkin

(Yes, I know it's nearly the end of July already!)


Sneak Peek

Subscriptions

Are you a Paper Pumpkin subscriber? I've subscribed off and on over the last few years and I'm definitely more impressed with the quality of the kits I've received in the last year than the initial kits. They are well worth the price, since you receive a stamp set, at least one ink spot, all the projects pieces with accessories, plus shipping is included. Beginning tomorrow, they're an even better deal.

Deal Details

From July 23-September 10, Stampin' Up! is having a half-off sale for new subscribers!! The first two months of your subscription are half price, so this is a great time to give it a try. See all the Paper Pumpkin details and use the code HALFOFF when you enter your subscription tomorrow to receive the discount.


Paper Pumpkin Sale

Disclaimer

Just so you know - the major reason I stop or put a hold on my subscription sometimes is really not due to the kit itself, rather it's due to my lack of time to create. Just like many of you, I get behind on putting the kits together. Then I feel like the only way to catch up is to stop getting new ones for a little bit. Every time I do that though, I see the newest kit and wish I had received it! SO, I've resolved to get caught up on all the kits in the next month. Then I can enjoy each one as it arrives :).

Let's Get To It!

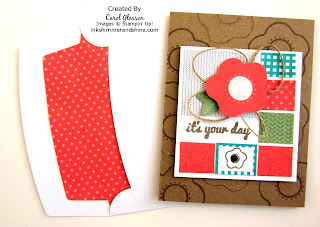
Last night I finished the last card in the June kit (and a new kit just arrived on Saturday - lol!). Without further delay, here are the first four cards using the It's Your Day stamp, along with the flower stamps in the kit.
4 Flower Cards from June 2015 Paper Pumpkin

Aren't they bright and cute? The kit includes the envelopes and matching envelope liners, which you can use as shown, or leave the liners out and use the paper for other projects.

Stamps included in the June kit

Flower Card Variations

I've made one of the cards close to the sample in the kit. 


Original Flower Card Design

The next card, is just a variation in the placement of the rectangles and the orientation of the card.

Different card orientation 

On the third card, there was a little oops. I accidentally got ink from the clear block on the top of the card. What to do? Add some banners and stars to cover it up :) Then add the circles from the inside of the flowers and stamp them with the small flower.

Fixed the Oops! by adding a banner and stars


On the final flower card, I cut the large Calypso Coral rectangle into rectangles the same size as the other coral and green one. Then I cut around the outside of the piece remaining on the sticker sheet where the blue checkered rectangle was and stamped a flower inside it.

Extra Rectangles Card
Card with extra rectangles

Geometrical Cards

Next, on to the geometrical triangle cards! On one I stamped stars behind the front panel. The only elements that were not included in the kit were a couple of candy dots and sequins. The one on the left also uses a couple leftover pieces from the sticker sheet.

Geometrical cards from the 2015 June Paper Pumpkin kit
First two geometrical cards
The third card is similar to these, and the last one uses pieces fussy cut from the sticker sheets around the flower and leaf shapes, and the center pieces from two of the flowers. The dots were punched from the large coral rectangle that I had cut down for the last flower card shown above.

Geometrical and Flower Card from June 2015 Paper Pumpkin kit
One more geometrical card along with flower "leftovers" card.
These are just a few examples of all the cute cards you can create with Paper Pumpkin kits! The best part is that you can use the remaining supplies and some card stock to create even more cards with the stamps and Tip Top Taupe ink spot. Here's what I had left over after completing 8 cards: one flower, lots of wooden banners, twine, stickers, ink and stamps

Leftovers
Why not give Paper Pumpkin a try by signing up for this great deal tomorrow?


You can find even more inspiration for your kits on my Paper Pumpkin Pinterest board.


Monday, July 13, 2015

Glass Block Stamping

Monday CASE of a Pretty Flower Block Card


Lately, my time for stamping has been quite limited with all the gardens calling to me for daily weeding and nurturing. So I find myself looking for cards to case to get my creativity jump-started quickly. Here's the one I found today:


I love the colors, flowers and graphics. My goal was to create a similar effect with glass-block stamping and some Stampin' Up stamps and re-inkers. I had so much fun, and this is what I created.


Tips and Tricks
  • Vary the sizes and shapes of your glass blocks and stamp off the edges of the card stock to fill in the card base.
  • If you want to stamp solid block images, apply a drop of re-inker to the block, then use an aqua painter to add water and spread the ink around, then stamp. For lighter color, use more water, for more intense color, use more ink than water.
  • If you prefer a less-solid effect, ink the glass block by pressing it directly on a stamp pad and stamp on watercolor paper. Here's an example:


Fabulous Work of Art Card
Stamp Sets:
Glass Blocks: A, C, G, H

Ink Pads or Re-inkers:
  • Washi Tape
  • Aqua Painters

Have fun! Experiment with color combinations and different stamp sets, then show off what you created! 
If you'd like to order any of the items featured here, please Visit my online store .


Monday, June 22, 2015

Butterfly Basics for Mom and Everyone Else too!


Butterfly Basics Variations


I'm loving the Stampin' Up! Butterfly Basics stamp set. The two cards above were cased from the card below that I received in a 2015 Leadership swap (sorry I don't know who it's from, but if you do, let me know). I simply added a Mother's Day greeting to it.

For the first card above I die cut the butterfly with the Butterfly Thinlit die from a piece of striped dsp that I really didn't like much at all (Autumn Traditions in the Stampin' Up! 2009-2010 catalog). First row, second image below.


Because the die cuts so many holes, it really broke up the striped pattern. I kinda like the way that the butterfly's body is mostly pinkish and the wings are multi-colored. The ink is Perfect Plum, Crumb Cake and Sahara Sand with splotches of Blushing Bride. Above the Perfect Plum stripe is a piece of Epic Day washi tape with a bow tied with linen thread.

The second card above uses gold embossing powder and Pear Pizzazz ink, along with another scrap of Autumn Traditions dsp (first row, third image) for the butterfly. The flower is embossed with white embossing powder on vellum and a little bow was created with gold Baker's twine. 1/8" Gold ribbon was tied around the Very Vanilla cardstock for a little extra bling.

Leadership Swap Card with added sentiment

All three of these cards used the Happy Mother's Day stamp from the Stampin' Up! Teeny Tiny Wishes stamp set. This is a wonderful set with stamps for just about any occasion. So even though Mother's Day is over for this year, you could easily change out the greeting for a birthday, thinking of you, sympathy or get well sentiment.

If you love the stamp set and Butterfly Thinlits, you can order them in a bundle, as well. You'll save a little money and you can make as many variations as you like!


Tuesday, June 2, 2015

Trifecta Today!

Today is the trifecta! - It's the LAST DAY to order products retiring from the 2014-15 Stampin' Up! catalog, the LAST DAY to order from the Occasions catalog, AND the FIRST DAY to order from the NEW 2015-16 Stampin' Up! catalog!! 

Get your orders ready! Stampin' Up! will be rockin' today!!!

Don't forget that Tuesday, as always, is the first day for new Weekly Deals - check them out in the sidebar!

Wednesday, April 22, 2015

Retirement is Coming!

No, not MY retirement – lol! I can dream, right?

Stampin’ Up! is having a retirement sale (Some items at discounts up to 50 percent off retail) to make room for the new catalog items coming in June!


Here’s a link to a quick video featuring some of the retiring items:


You can see the full list by clicking the link below and then clicking the Shop Now link:

Stamp sets will be available until May 26; other items are only WHILE SUPPLIES LAST.

The list is updated daily since some items sell out quickly (some are already gone!!).

There are also new Weekly Deals and Clearance Rack items, so be sure to check those out as well!

Let me know if I can help you snag a deal on something on your wish list!

Thanks!


Carol

Thursday, April 9, 2015

Go Ahead and Splurge a Little Today and Save Some Money too!

The other day I was cleaning my stamping space to make sure I have room for all the items that will be available in the new Stampin' Up! catalog that will be arriving soon (never too early to prepare for new stuff!). In the process, I ran across some sweet little note cards that have been around for a little while. (OK, maybe a little while is an understatement.)

They were begging for a little color, so I got out my ink refills and aqua painters and got to work. After painting them, the notecards seemed a bit flimsy, so I cut off the fronts and adhered them to some Bermuda Bay cardstock, along with coordinating cardstock and designer series paper. Then I added Crystal Effects to the bubbles to give them a little dimension. Here's how they turned out:


They were so much fun to color!
When was the last time you colored or painted just for the fun of it?
If you're like me, it's been a while.

Right now is a great time to try it!

Until Friday, April 10, 2015, you can splurge a little on Stampin' Up! Products because Shipping is FREE! That's a great deal because normally shipping adds a minimum of $6.95 to your order. So now you can use those $$$ to buy the crafting products you love :)
Go ahead, I give you permission. 
Get a couple of ink refills, an aqua painter or two and some pretty paper and give it a whirl!


Tuesday, March 31, 2015

Last Day

Today is the last day of March - already! Sale-a-Bration ends today :( , but rest assured, the weather man says that the SPRING WEATHER is arriving soon!

Did you catch that part about Sale-a-Bration ending today?

What does that mean?

Well, if you haven't yet taken advantage of the free products you can earn for every $50 in product ordered, or even if you have, and you want to do it again, it's not too late! But you need to get right on it! Check out some of these free items:


Then pick the top items on your wish list along with your favorite free items and Shop Online Now to place your order.

The hard part is choosing your favorites from all the great products, the rest is easy! (It gets easier with practice. Trust me, I've done it a lot!)

Happy Sale-a-Brating!


Saturday, March 28, 2015

You Rock

While I was busy creating the You and Me card the other day, I created a 'You Rock' card as well. Once again, it doesn't look anything like the original card, but here it is in all its glory. :)


The tree leaves are embossed in silver then daubed with summer starfruit and certainly celery ink. I had an idea about creating "splashy" water with pool party embossing and the Gorgeous Grunge stamp, but I'm not sure I like the way it turned out. 

I think the Pool Party color is too light, but what color should a splash of water be? 

Do you like it? Leave me a comment and let me know.

Friday, March 27, 2015

Adventure Bound Case

Last night I went down to my craft room because I was inspired by this card on Pinterest and wanted to CASE it. So I pulled out the Adventure Bound paper stack, looking for the rock paper. I had an idea about using the rocks along the bottom of the paper like rocks by the sea, but after I cut the paper, the card just wasn't coming together. SOOOO, I ....

  • Chose a different paper from the paper stack
  • Cut it to 5-1/4" x 4"
  • Cut a piece of Natural Ivory card stock to 5-1/2" x 8-1/2" for the card base
  • Adhered the paper to the Natural Ivory base.
  • Saw the Sophisticated Serifs stamp set on my desk, and exclaimed "Ooh, a door!", and stamped it in Classic Black ink on Natural Ivory, then cut it out with my paper trimmer.
  • Added a doorknob (black candy dot).
  • Saw the From the Garden stamp set and thought "That would make a pretty window", so I stamped it on the door in Classic Black ink.
  • Picked up the You & Me stamp from Perfect Pennants, inked it in Versamark and heat embossed it in Calypso Coral ink on the brick wall, kinda like graffiti.
And here's the result of the stamping, snipping and gluing:


Simple.
Looks just like the card I cased, right?
 
Does that ever happen to you? You have an idea about something you're going to make, and during the process it morfs into something completely different?
 
Leave me a comment and tell me about the last project you made that didn't end up anything like you first envisioned it.


Tuesday, February 24, 2015

Best Day Ever Happy Dance

Do free crafting products make you dance? 

I love to create things, and when I get free products to make them with, I do a little happy dance!

That's what happened when I received the Best Year Ever Designer Series Paper and the coordinating Best Day Ever Stamp set during Stampin' Up!'s Sale-a-Bration.


 (If I mix up Best Day Ever and Best Year Ever, please forgive me. Why couldn't they both have the same name to make it easier for confuzzled brains like mine to remember?)

I've already shown you some easy card samples with the Best Year Ever paper (on this Paper Pumpkin card, this Thank You card, and these two cards), so today I've used the Best Day Ever stamp set to create this card for you:


Isn't that a fun and easy card?
You get to choose the colors that make you happy, and stamp a pattern that makes you dance!

My choice was Whisper White, Bermuda Bay, Coastal Cabana and Crushed Curry.
What will YOU choose?
Here are all the supplies used to create this card today:

Product List
Stamp
Ink
Card Stock
Punch
Ribbon & Trim
Big Shot

Monday, February 23, 2015

PPA 240 You Brighten My Day!

You Light Up My Life & Brighten My Day!


On a gray winter day in Wisconsin, whose day couldn't use a little brightening? Today I played along with the Pals Paper Arts Challenge (PPA240) and this sketch:

PPA240

Last week, as I was twiddling around an idea about how I could combine the sentiments I love from two different stamp sets, I saw this PPA sketch and decided to try it out. So here's what happened...


Simple.
Bright yellow contrasted with winter gray.
A little cut with the paper trimmer.
Punch, punch, punch.
Add a little washi tape.
Done.

Will you brighten someone's day with a handmade card today?

Hope so.

Product List
Stamp
Ink
Card Stock
Punch
Accessory

Friday, February 20, 2015

Paper Pumpkin Parts Produce Pretty Patterns

Take a few scraps and leftover pieces from Paper Pumpkin kits and put them together. Ta-da! A bright, pretty patterned card, full of hearts and love:


Hope that cheers you up on a cold winter day!

Happy Stamping!

Wednesday, February 18, 2015

Have You Used Your Paper Pumpkin Pieces?

Use Every Piece of Your Paper Pumpkin!

Do you ever finish creating a kit and have some pieces left over? I'm always behind on putting my Paper Pumpkin kits together! Sometimes I'm not even sure which kit the parts came from :) So recently, I put together a card to clean up some leftovers on my table. It's fun to mix and match the pieces to come up with a card like this:


Love Notes

One of the kits I used is the from the Love Notes Paper Pumpkin, January 2014, including the fancy card base with the triangles cut out on the front. I added a Coastal Cabana and Summer Starfruit heart, the coordinating arrow border, and the XOXO sentiment. Then I stamped 'Love' in Soft Suede on the Kraft background.

You may recognize the little Calypso Coral heart between the man and woman as a scrap from the April 2014, Framed Love Paper Pumpkin. The kit was originally used to create a Mother's Day frame. 

Next I was searching for coordinating paper, and what did I find? The Best Year Ever paper from the Sale-a-Bration catalog, which I adore! Don't the colors go well together with this set? They look like they were meant to be together!

Real Life Journal

The man and woman wooden cutouts on this card are from the December 2013,  Paper Pumpkin - Real Life journal. With the Love stamp, and the tiny little hearts, this card could be used for any sweet occasion. Maybe a non-traditional valentine, a wedding card, or just an 'I love you' card.

Check Your Stash

Look around your craft room and see what you can combine together to come up with a new creation. With Paper Pumpkin kits, it's especially easy, since many of the parts are cut or punched for you, and some are just 'peel and stick'. How easy is that??

If you're not currently subscribing to Paper Pumpkin and you'd like to try it, I'd love to show it to you! Or you can go directly to the Paper Pumpkin link to get started.

More Inspiration

See more Paper Pumpkin samples on my Pinterest Paper Pumpkin board.

Happy Stamping!

Tuesday, February 17, 2015

Spritzing Hooray It's Your Day

Spritz Your Cares Away!


After I played with the spritzer a couple of times, I was ready for my second spritzing adventure. (If you missed my first attempt, you can see it here). So I created a birthday card with the Hooray It's Your Day Simply Created kit and matching Hooray It's Your Day stamp set. So much fun!

Stencil It


The kit comes with two stencils, and lots of other products to create 20 cards, 5 each of four designs! Here's what's included:


The colors in the kit are Daffodil Delight, Melon Mambo, Bermuda Bay and Wild Wasabi. You can also use any of your favorite ink colors with the stencils and spritzers to create additional cards! 

Get Together With Friends to Create this kit!


Note that this kit is not an all-inclusive set, so you will need to have some ink pads and ink refills, a stamp set, adhesive and scissors to complete this project on your own. Better yet -  it's a great kit to make with your demonstrator and a group of friends. Just get the kit and have your demonstrator bring the additional supplies, then start creating!

The kit comes with two spritzers - yay! There are coordinating envelopes, die cut tags, wood cutouts, washi tape, baker's twine, and many other fun products to play with.

Birthday Girl


For this card, I used the stencil and a strawberry slush ink refill. I simply added about 15 drops of ink to the spritzer along with rubbing alcohol, and spritzed this matchbox fold card. You can vary the color by adding different combinations of ink, and change the color intensity by adding different amounts of alcohol, or water, to the spritzer. Try it out on a piece of scrap paper to test the color first.

After the ink dries, add a white banner from the kit, and stamp 'Birthday Girl' from the Hooray It's Your Day stamp set on it. If you like, you can stamp the little stars from the same set in Bermuda Bay. Next, add a little washi tape, the hello wood cutout (I used tombow glue for this), and a few sequins to create a cute card for the birthday girl!


What do you think? I love the color! Now, you try it and share what you create!
Happy stamping!

Product List
Stamp
Ink
Tools & Adhesive
Accessory

Monday, February 16, 2015

Thank You Best Year Ever

Sale-a-Brate with Best Year Ever

The 2015 Stampin' Up! Sale-a-Bration catalog is full of products I love! One of my favorites is the Best Year Ever designer series paper that you can choose as a free product when your order of fabulous products from the Occasions or annual catalogs reaches $50 (before tax & shipping).

Today I have a simple cheery Thank You card to share, using Best Year Ever paper with the cute little Petite Petals stamps and punch, and the Cheers To Love stamp set:

Thank You So Much card

Color Combo

This paper has a great combination of colors: Calypso Coral, Coastal Cabana, Crushed Curry, Sahara Sand, Soft Suede and Whisper White. This makes it super simple to change the color of your base card stock and coordinating ink color for your sentiment to create a whole set of cards for different occasions.

More Samples

Use these links to see a couple of other samples using this pretty paper for birthdays, weddings and new babies.

You Choose

Then see the supply list below for ideas to start your list of coordinating products so you can create all the cards you need for upcoming occasions. If your list totals $50 (before tax & shipping), you could choose this Best Year Ever paper as your free Sale-a-Bration item! Make your selections soon...Sale-a-bration ends March 31, 2015!

Product List
Stamp
Ink
Card Stock
Punch
Accessory

Friday, February 6, 2015

Creativity is for Everyone

 Creativity

“I’m not creative”. How many times have you heard someone say that?  

Yet, is it really true?  

The Creative Process

When someone makes that statement in reference to card-making, to me it means “I have not had the chance to play and explore enough to feel confident in using the products available and coming up with my own designs”.
Did you make your first card or your first art project completely on your own, with no instructions, and with materials you had never used before? If you did, were you overjoyed with the way it turned out?

The Learning Curve

Most of us have had the experience of being a bit intimidated when we’re asked to do something we haven’t done before, or when we’re asked to do a familiar process in a different way. There’s a learning curve that makes us uncomfortable. Until we’ve gone through the process a few times (or many times), we have to think about it each time, and maybe try different ways of doing it until it becomes our new routine. 

Exploring

That’s part of the fun and excitement in life – trying new things, or trying old things in new ways! Challenging ourselves and exploring opportunities keeps things fresh. We try new recipes, new restaurants, new hobbies, etc. Sometimes we’re forced to do it because we’ve lost a recipe or our favorite restaurant closed. Sometimes we do it just because we want to shake things up.
I went through this learning curve the other day when I opened the Stampin’ Up! “Hooray It’s Your Day” Simply Created kit I received at Leadership Convention in Orlando last week.  The kit contains card bases, envelopes, die-cut accents, baker’s twine, cute star paper clips, washi tape, spritz masks, Stampin’ Spritzers, and Stampin’ Dimensionals.  This is a great kit with several different card designs, and one is a gift card holder! You'll need to add a few additional items for this project, such as the coordinating Hooray It's Your Day stamp set and re-inkers.

Spritzing?

Most of these products in the kit I had used many times before, but when I read the instructions and found out the first thing I needed to do was spritz the card with two colors of ink, I had a small panic moment.
“Spritz? I don’t really know how”, I thought. “How hard can it be?” was my next thought. Well, it turns out that it’s really easy to spritz, but a bit more difficult, but doable, to get the exact results you want.

Basically you put either water or rubbing alcohol in the spritzer and add a few (or a lot) of drops of ink, put the cover on, and shake it up to mix it. Then you spray (spritz) it on your project. Easy. 
The more difficult part is getting the exact color and spray effect that you want. This depends on your combination of ink and water/alcohol, as well as how much pressure you put on the spritzer and the distance between the spritzer and the project when you spritz it. If you spritz too much, you may end up with a blob, or the color may bleed through the cardstock. Too little, and you might not get the color or coverage you want (but you can always add a little more spritzing).

If you haven’t tried spritzing before, I suggest that you:
  • Cover your work area with scrap paper first.
  • Then watch this entertaining video by Brian Pilling to learn some tips. I tried to embed the video here, but the wrong video comes up when I do that!
  • Finally, get some Stampin’ spritzers and re-inkers. You don't have to have the kit in order to get started spritzing, but it is a fun one!
  • Point the spritzer at your project and spritz away!
 

 Here is my first spritzing attempt (before I watched the video):


The ink colors are Pretty in Pink (retired) on the right side, and Strawberry Slush on the left. As you can see, the color coverage is not uniform across the background pattern, but that’s OK.
Use scrap paper and just play around and experiment with your ink and water/alcohol mix until you get the color you want. Once you’re satisfied with the color mixture, test spray patterns to see what works best for you. Then, just go for it, and spritz your project!!!

Look for more spritzing samples that I'll be sharing in the next couple of days.


Happy stamping!