Monday, October 31, 2016

Reindeer Tag

Christmas Tags for All Your Gifts

Here's a quick little tag that will add a cute touch to all of your Christmas gifts!


Photo of the Reindeer gift tag

How To Make It:
  1. Cut Whisper White card stock to 2" x 3-1/2".
  2. Punch one end of the Whisper White piece with the Scallop Tag Topper punch.
  3. Stamp the 'To: From:' stamp from the Cookie Cutter Christmas stamp set, near the bottom of the tag is Real Red ink.
  4. Cut a 2" x 2" piece of Candy Cane Lane Designer Series Paper (DSP) and adhere it to the card, centering it between the sentiment and top of the tag. Today, October 31, is the LAST DAY OF THE BUY 3 GET 1 FREE Designer Series Paper sale!! Be sure to get your order in today!
  5. Stamp the Reindeer from the Cookie Cutter Christmas stamp set in Early Espresso ink on Very Vanilla card stock.
  6. Punch the reindeer out with the Cookie Cutter Builder Punch. Don't forget you can bundle the Cookie Cutter Christmas stamp set and Cookie Cutter Builder Punch and save money!
  7. Punch out a red glimmer bow with the Cookie Cutter Builder Punch.
  8. Attach the reindeer to the tag with 2 Stampin' Dimensionals.
  9. Attach the bow with a mini glue dot to the antler for a girl reindeer, or as a bow tie for a boy reindeer.
  10. Cut Real Red ribbon and tie it through the punched hole to finish your tag. Now you're ready to finish off your gift wrapping!

Friday, October 28, 2016

This Christmas

Season of Cheer Card

When we gathered earlier this week for the Shimmer and Shine Christmas card class, we made this card featuring the Stampin' Up! This Christmas Designer Series Paper and the greeting from the Jar of Cheer stamp set. There are lots of layers, but it's quite easy to stamp and assemble!


  1. Cut the following:
  2. Fold the Mint Macaron card base in half.
  3. Adhere the Garden Green layer in the center.
  4. Center the 4" x 4" DSP over the Garden Green layer.
  5. Cut the two Cherry Cobbler squares in half, corner to corner, to make triangles. Then adhere the triangles to the corners of the DSP to create a frame.
  6. Round the corners of the 2-1/2" x 2-1/2" Mint Macaron square with the Project Life Corner Rounder punch.
  7. Attach this square to the center of the DSP as shown.
  8. Die cut a Basic Black 2-3/8" circle with a framelit and layer it in the center of the Mint Macaron square.
  9. Stamp 'Wishing You a Season of Cheer' from the Jar of Cheer stamp set in Garden Green ink on a scrap of Very Vanilla card stock.
  10. Punch the stamped sentiment out with a 2" circle punch and adhere it to the center of the black circle and your card is complete!
We hope you'll give it a try! The 'This Christmas' Designer Series Paper featured here is a great option for all of your Christmas cards. There are 24 double-sided sheets in a package, and they're thinner than most of the DSP. So you can make a LOT of cards with just one package and even with the layers, they are not too heavy for mailing! Come back tomorrow to see another sample!

Thursday, October 20, 2016

Merry Little Treat Bag

Christmas Tag for a Treat Bag or Card


Today I have a little treat bag for you that we made last week at our Holiday Crafting Open House. We're lovin' the new Stampin' Up! Copper Embossing Powder and Holiday Catalog!

  • Cut a 2” x 3.5” piece of Whisper White regular or thick card stock with the Paper Trimmer.
  • Punch one end of the tag with the Scallop Tag Topper punch.
  • Stamp the ‘Merry’ sentiment from the Jar of Cheer stamp set in the middle at the bottom of the tag in Cherry Cobbler ink.
  • Stamp the Solid Xmas tree shape stamp in Mint Macaron about ½” above the “e” in Merry, and let it dry.
  • Rub over the tag with the Embossing buddy.
  • Use the Xmas tree branches stamp & Versamark ink to stamp the tree branches over the mint macraon background you just stamped.
  • Cover the Versamark image with Copper embossing powder. Tap off any extra powder.
  • Heat the embossing powder with the teat tool until the powder melts. Do not overheat!
  • Stamp the small star in Cherry Cobbler at the top of the tree.
  • Tie a 6” piece of 5/8” Organza ribbon through the hole at the top of the tag.
  • Fold the top of the polka dot gift bag back along the score line.
  • Attach the tag with 2 Stampin’ Dimensionals to the green banner that has been cut using the Big Shot and Banner Framelits dies.
  • Add the banner to the bag with Stampin’ Dimensionals.

NOTE: The polka dot bags have been discontinued, but there are Kraft and Glassine bags on p.176 in the Annual Catalog that could be decorated and used instead. The tag could also be used on a card front.

Stampin' Up! Supplies: 
AC = Annual Catalog; HOL = Holiday catalog

All of these items can be ordered by clicking HERE to go to my online store.

Description
Catalog/Page
Item #
Price
Paper Trimmer (includes Cutting & Scoring blades)
Ac/189
126889
$30
Whisper White card stock
AC/170
100730
$9 (40 sheets)
Or Thick White Card stock
AC/175
140272
$7 (24 sheets)
Scallop Tag Topper Punch
AC/186
133324
$23
Jar of Cheer stamp set
HOL/25
142161
$21
Clear Glass Blocks
AC/183
Various
$4-$12 each or bundle
Cherry Cobbler Ink
AC/170
126966
$6.50
Totally Trees stamp set
HOL/48
142198
$26
Mint Macaron Ink
AC/169
138326
$6.50
Embossing Buddy
AC/181
103083
$6
Versamark Ink
AC/180
102283
$8.50
Copper Embossing Powder
AC/181
141636
$5
Heat Tool
AC/181
129053
$30
5/8” Organza Ribbon
AC/178
114319
$6
Stampin’ Dimensionals
AC/182
104430
$4 (300)
Big Shot
AC/190
143263
$110
Banner Framelits
AC/193
132173
$27
This Christmas Designer Series Paper
AC/172
141628
$13 (24 sheets)
Kraft or Glassine Bags
AC/176
Various

Hope you enjoy the treat bag and make one of your own!

Happy Stamping!

Tuesday, October 18, 2016

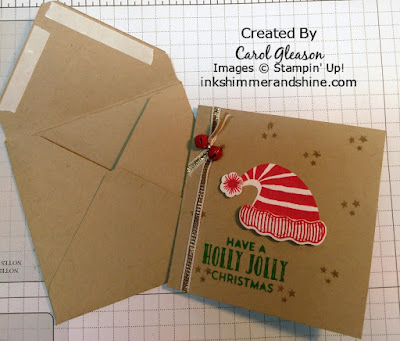
Holly Jolly Gift Card and Envelope

Have a Holly Jolly Gift Card & Envelope

Last week at our crafting open house we made this cute little 3x3" gift card and used the Envelope Punch Board to make a matching Crumb Cake envelope.

Photo of Holly Jolly Gift Card & Envelope

  1. Cut a piece of Crumb Cake card stock to 3” x 6”. Score at 3”.
  2. Stamp the sentiment “Have a Holly Jolly Christmas” from the Stitched With Cheer stamp set in Cucumber Crush ink, near the bottom of the card front.
  3. Stamp the hat pieces in Real Red using the Jolly Friends or Cozy Critters stamps set.
  4.  Punch out the hat pieces with the Jolly Hat Builder Punch.
  5. Adhere the hat to the center of the card front, then add the hat brim and pompom with small pieces of foam adhesive strip.
  6. Stamp the 3 stars stamp from the Jolly Friends stamp set in Crumb Cake ink randomly on the card front.
  7. Add a piece of 1/8” gold ribbon and tie in a knot, then trim the ends as needed.
  8. Add 2 jingle bells with glue dots.

For the envelope:

(Stampers had a choice of Stampin' Up! envelope paper in Cucumber Cursh (retired) or Crumb Cake cardstock for their envelope.)

  1. Start with a piece of crumb cake card stock or green envelope paper, cut to 5-1/4” x 5-1/4”.
  2. Align the left edge of the card stock on the envelope punch board at 2-5/8”.
  3. Punch and score.
  4. Rotate the paper, line up the score line on the score guide. The edge of the paper should again line up at 2-5/8”.
  5. Punch & score.
  6. Rotate the paper and repeat punch and score two more times.
  7. Round the edges using the back side of the envelope punch.
  8. Adhere the envelope together with tear & tape adhesive, leaving the paper on the adhesive for the open edge, until you’re ready to add the card and seal the envelope.


Saturday, October 8, 2016