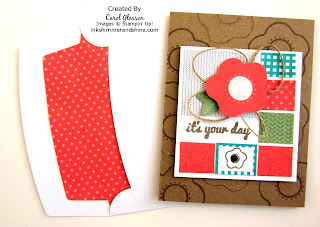
June Paper Pumpkin
(Yes, I know it's nearly the end of July already!)
Are you a Paper Pumpkin subscriber? I've subscribed off and on over the last few years and I'm definitely more impressed with the quality of the kits I've received in the last year than the initial kits. They are well worth the price, since you receive a stamp set, at least one ink spot, all the projects pieces with accessories, plus shipping is included. Beginning tomorrow, they're an even better deal.
Deal Details
From July 23-September 10, Stampin' Up! is having a half-off sale for new subscribers!! The first two months of your subscription are half price, so this is a great time to give it a try. See all the Paper Pumpkin details and use the code HALFOFF when you enter your subscription tomorrow to receive the discount.
Disclaimer
Just so you know - the major reason I stop or put a hold on my subscription sometimes is really not due to the kit itself, rather it's due to my lack of time to create. Just like many of you, I get behind on putting the kits together. Then I feel like the only way to catch up is to stop getting new ones for a little bit. Every time I do that though, I see the newest kit and wish I had received it! SO, I've resolved to get caught up on all the kits in the next month. Then I can enjoy each one as it arrives :).
Let's Get To It!
Last night I finished the last card in the June kit (and a new kit just arrived on Saturday - lol!). Without further delay, here are the first four cards using the It's Your Day stamp, along with the flower stamps in the kit.
 |
4 Flower Cards from June 2015 Paper Pumpkin
Aren't they bright and cute? The kit includes the envelopes and matching envelope liners, which you can use as shown, or leave the liners out and use the paper for other projects.
 |
Stamps included in the June kit |
Flower Card Variations
I've made one of the cards close to the sample in the kit.
 |
| Original Flower Card Design |
The next card, is just a variation in the placement of the rectangles and the orientation of the card.
Different card orientation
On the third card, there was a little oops. I accidentally got ink from the clear block on the top of the card. What to do? Add some banners and stars to cover it up :) Then add the circles from the inside of the flowers and stamp them with the small flower.
 |
Fixed the Oops! by adding a banner and stars |
 |
| Card with extra rectangles |
Geometrical Cards
Next, on to the geometrical triangle cards! On one I stamped stars behind the front panel. The only elements that were not included in the kit were a couple of candy dots and sequins. The one on the left also uses a couple leftover pieces from the sticker sheet.
 |
| First two geometrical cards |
 |
| One more geometrical card along with flower "leftovers" card. |
 |
| Leftovers |


