Tuesday, December 9, 2014

Bermuda Bay Merry Little Wish


The color of this card base, Bermuda Bay, always makes me happy! It reminds me of the beach. So my merry little wish today is to be somewhere warm, with my toes in the sand :). 

Don't you just love the texture of the burlap ribbon against the Bermuda Bay background? The Christmas tree from the Stampin' Up! Festival of Trees set is embossed with Pool Party embossing powder on Whisper White card stock, then the ornaments were stamped in Versamark ink and embossed with gold embossing powder. Finally, the tree was topped with a gold glimmer star, punched with the itty bitty accents punch. 

The sentiment is stamped in Bermuda Bay ink on Whisper White card stock and punched with the large oval punch, and added to a Coastal Cabana scallop oval.

Dimensions: Bermuda Bay: 5-1/2" x 8-1/2", Coastal Cabana: 2-1/2" x 3-3/4", Whisper White: 2" x 3-1/2". Both the coastal cabana and whiper white piece are rounded on one side with the Project Life corner rounder punch.

Click any of the links in the project description to go to my online store to find these products. I'd love to see what you create!

Happy Stamping!

Saturday, December 6, 2014

Big News Birthday


Birthday cards seem to be the cards I need most often, so I like to keep a variety on hand. Today's card is an easy (less than 10 minute) card for the Song of My Heart Christmas party Shoe Box Swap.

If you're not familiar with shoe box swaps, basically each person who is attending designs a card and cuts a set of all the pieces for each person who is attending and puts them in a shoebox or other container. Then they add the stamp set, any ribbon, embellishments,  a glass block, punches, ink pads, etc. to the box so that everyone else can recreate the card that they designed. We go around the room, making each of the cards, with a break for fun and food about halfway through the process. Since we have about 20 people attending, that's quite a bit of stamping!

The Designer Series Paper (dsp) is from the Stampin' Up! Lullaby pack. There are some great patterns in the set that can be used not only for baby cards, but for many other occasions too. I thought that the baked brown sugar and pistachio pudding patterns worked well for a more masculine birthday card.

Start by cutting your 5-1/2 x 8-1/2 card base from Crumb Cake card stock and folding in half.  Then cut a 1" x 5-1/2" strip of the brown sugar Lullaby dsp, a 3-3/8" x 2-1/2" piece of whisper white card stock, and a 4" x 2-3/4" piece of pistachio pudding Lullaby dsp. Stamp the birthday sentiment from the Big News stamp set in Wild Wasabi ink on the whisper white card stock, then attach the pieces. Next, stamp the candle twice in Pistachio Pudding ink. If desired, you can use the Wild Wasabi Stampin' Write Marker to darken the wick a little, especially on the dsp.

Punch two stars from gold glimmer paper and attach with a glue dot at the top of the stamped wick.

Lastly, stamp 'Enjoy the fuss' in the lower right corner in Baked Brown Sugar ink.
Quick and easy! Just what this season of holiday busyness calls for.

Visit my online store to purchase these or many other great Stampin' Up! products. As always, the clearance rack items are in the rotating display on the right panel of my page, so check there for great stocking stuffers!

Happy stamping!

Friday, December 5, 2014

Merry Little Wish Bag

No time to make a card today, but I found a little time this week to finish up a couple of Paper Pumpkin bags that were left over in my craft room from the In The Bag Kit:

The first one just uses the circles and letters from the kit, and may get more embellishments at a later date. It's looking a wee bit plain for a party bag :)


For the second one, I turned the blue circles over and used the plain white side, then added circles of wild wasabi behind the letters. I cut a star with the star framelit die from Wild Wasabi card stock, and cut an additional star the same size using the red-flocked window sheet from the Stampin' Up! Candlelight Christmas stack (retired). Then I used two star framelits to create a Real Red border around it.  Little gold glimmer stars were punched using the star punch from the Itty Bitty Accents Punch Pack.

If you don't have the February 2014 Paper Pumpkin kit, you could make your own circles with punches or dies and add lettering with stickers or stamps. For the red-flocked window sheet you could add color to a plain window sheet with heat embossing or craft ink, or substitute a stamped star for the window sheet. There are SOOOO many possibilities!

Paper Pumpkin kits make great gifts too! You can purchase them as a prepaid subscription or as a month-to-month subscription. See all the details on prepaid subscriptions here.


If you're interested in a month-to-month subscription you can visit My Paper Pumpkin to get more information and to sign up today! There are many ideas for Paper Pumpkin kits on my Paper Pumpkin Ideas Pinterest board. So check them out, then come join the fun!

Happy Stamping!


Tuesday, December 2, 2014

Merry Little Wish Upon Christmas Stars


At our October Stampin' Up! demonstrator group meeting I shared this card as our Make 'n Take.

After I designed it and cut the pieces I laid them all out on the floor. I checked twice to make sure I had cut all the card stock pieces, had included the Delicate Designs embossing folder, the star framelit die, heat tool for embossing, gold embossing powder, envelope punch board (to round the corners), gold baker's twine and stamps for the Festival of Trees star and sentiment and Stampin' dimensionals to pop up the Old Olive piece. Suddenly I realized I was missing the Crumb Cake card bases! (Hard to make the cards without those - LOL!) So back to the cutting table to cut card bases...

Then I thought I was all set. But the night of the demo meeting I noticed everyone was making the card without doing the embossing for the stars. Why was that, I wondered? Then one of the ladies informed me that there was no Versamark ink pad AND they were borrowing a glass block from another table because I forgot that as well. Duh! The best laid plans don't always work out the way you imagine!

The card looks so simple, how can it possibly need all that stuff????
So don't worry if you don't have all the supplies I used, just substitute as needed and make your card! Happy Stamping!

Monday, December 1, 2014

Starry Medallion Wreath


I went down to my craft room for a little stamping time and once again, those cute little stars from the Noel Paper Pumpkin kit grabbed my attention. There was a stack of partially finished Paper Pumpkin kits on my desk, and these stars were on top. If you're not familiar with Stampin' Up!s My Paper Pumpkin subscription service, you can find the details here.

The Daydream Medallion stamp set had also been left out on my desk (I don't always have the neatest stamp room - LOL!), so I inked it up in Versamark and heat embossed the stamp in silver with the intent of making a wreath. Then I used the coordinating Floral Frames framelit die to cut out the medallion.

 I knew I wanted to use those little stars, so I chose a stamp from the Letterpress Winter set for the center of the wreath and embossed that in silver as well. It fit so nicely inside the Daydream Medallion set, leaving just enough room for me to add stars! It doesn't show up real well in the photo, but the silver embossing is gorgeous. You can see the embossing a bit better here:


To attach the stars, I simply added a mini glue dot to the back of every other star and pressed them in place. Easy!

Once the stars were in place, the middle of the wreath begged to pop a little more, so out came the Flower Patch stamp set, which has a flower just the right size for the center. I stamped it in Real Red ink and added a rhinestone to the center for a little bling.

The sentiment is from the Good Greetings stamp set and is popped up with Stampin' Dimensionals on a small rectangle of retired Designer Series Paper (DSP), but any Real Red dsp scrap will work.

I love the Smoky Slate, Real Red and Whisper White combo. What do you think? I still have a lot of stars to play with, so look for more starry cards here on my blog.

Wednesday, November 26, 2014

Noel Paper Pumpkin Meets String Art

Yesterday, while cleaning up my unread email, I found this blog post on The Twinery's website and pinned this card:
 
 
I really liked the idea of using the twine behind the circle on a card. Immediately I ran down to my craft room and started to create one. However, my card took on a life of its own and there's no twine to be found on it...
 
When I sat down at my desk, it was piled up with several unfinished Stampin' Up! Paper Pumpkin kits. One of them was the Noel kit which has many little silver, gray and red stars stitched together. So I got the 'brilliant' idea of using the stars instead of the twine behind the cut out circle.
 
Umm, that didn't work out so well. The stars kept flipping over in the middle, then I got glue dots stuck to everything, and finally I moved on to plan B. Here's the result of my efforts:
 

To make the inside a bit neater behind the cutout, I added a piece of Stampin' Up! Real Red card stock and a few Christmas trees. Two of them are stamped with trees from the Festival of Trees stamp set. The other was punched out from the circle removed from the front of the card. The stamps and punch are also available as a bundled set, which makes popping these trees out super-easy! I added a sentiment (May the sparkle of the stars and all the peace on earth be yours this Christmas) from the Stampin' Up! Christmas Bliss photopolymer set (one of my faves).

Here's the inside:


Now, back to the craft room to finish the card I initially set out to create.....
 
Happy Stamping!
 
Carol


Saturday, November 22, 2014

Turkeys at Turner Hall

How many turkeys will be on your Thanksgiving table this year? These little Toms will be at the Turner Hall craft fair in Watertown, WI tomorrow!

 
Use the Stampin' Up! scallop circle punches, oval punch, the feet, eyes and heart from the owl builder punch, and the nose from the tip of the tree punch to make these guys.

After the show, some may show up on my Thanksgiving table along with the Big Tom Turkey.

 
Come visit us on the first floor at Turner Hall on Sunday!

Wednesday, November 12, 2014

One Sheet Wonder Candlelight Christmas


Isn't this Stampin' Up Candlelight Christmas paper festive?


Usually by this time of year, I'm nearly done making my Christmas cards to send to friends and family. This year, I'm behind, plain and simple. To make up for lost time, I've been going through the One Sheet Wonder templates I've saved to Pinterest and making about 10 cards at a time. For these, I used Sylvie's template at createwithpaper.com, but I was having a difficult time reading some of the dimensions, so I just made some changes.
Here are 2 photos of the 10 cards I completed. (I stole the Christmas Bliss piece that belonged to card #11, so that one isn't done yet....shhhh, don't tell!).


These little gingerbread folks are 'Early Espresso', even though they're looking a bit green here!


The Designer Series paper is Stampin' Up's Candlelight Christmas and is not in the current catalog. All other products are also Stampin' Up! except for the Christmas trees with the gold stars, which were cut from a recycled Christmas card.

Please leave a comment if you have a question about dimensions or products. Many of these products are available in my Stampin' Up! online store.

Happy stamping! I hope you have time to create something fun today.

Carol

Wednesday, October 29, 2014

Challenge Yourself

On Sunday I had some time to play in my stamp room - Yay! Since I've been busy with workshops, I decided it was time to just create something. So I scanned my Pinterest pins for a One Sheet Wonder template and used it to create these 9 cards:


The template I used was for an 8x8" piece of Designer Series paper, but I actually used both sides of a 12"x12" piece of Holiday Treasures (in the 2008 Fall Winter Stampin' Up! Idea Catalog). That was my challenge - to create something using the Holiday Treasures paper that I had in my stash for quite some time.

The original card designs can be seen here. As you will see, I modified the cards and colors for the paper and stamp sets I had in my stamp room. Many of these items are retired, but there are also some stamps and punches from the current Holiday catalog and the 2014-15 Annual Catalog.

I challenge YOU to create a One Sheet Wonder set using a piece of Designer Series Paper in your collection and substituting the stamps and paper that you have on hand!!!!

First, I will show the photos, then I will list the items used to create these cards (I may miss a few, but if you have questions about a particular card, just leave a comment!) All supplies are Stampin' Up! except the trees with gold stars that were punched from an old Christmas card.

Card #1:

Cardstock: Regal Rose, Whisper White, Certainly Celery
DSP: Holiday Treasures
Stamps: Many Merry Messages, Jolly Bingo Bits
Ink: Pretty in Pink
Other: 1/2" Pear Pizzazz Seam Binding Ribbon, Antique Brad


Card #2:


Cardstock: Always Artichoke, Pretty in Pink, Whisper White
DSP: Holiday Treasures; Tree punched from a Christmas card
Stamps: Good Greetings, Letterpress Winter
Ink: Versamark, Primrose Petals
Other: Gold embossing powder, Framed Tulips embossing folder

Card #3:


Cardstock:  Whisper White, Certainly Celery, Coredinations Primrose Petals
DSP: Holiday Treasures
Stamps: More Merry Messages
Ink: Primrose Petals
Other: Petals a Plenty embossing folder, Dimensionals


Card #4:


Cardstock: Pretty in Pink, Whisper White, Certainly Celery
DSP: Holiday Treasures
Stamps: Festival of Trees, Good Greetings, Letterpress Winter
Ink: Pretty in Pink, Certainly Celery, Primrose Petals
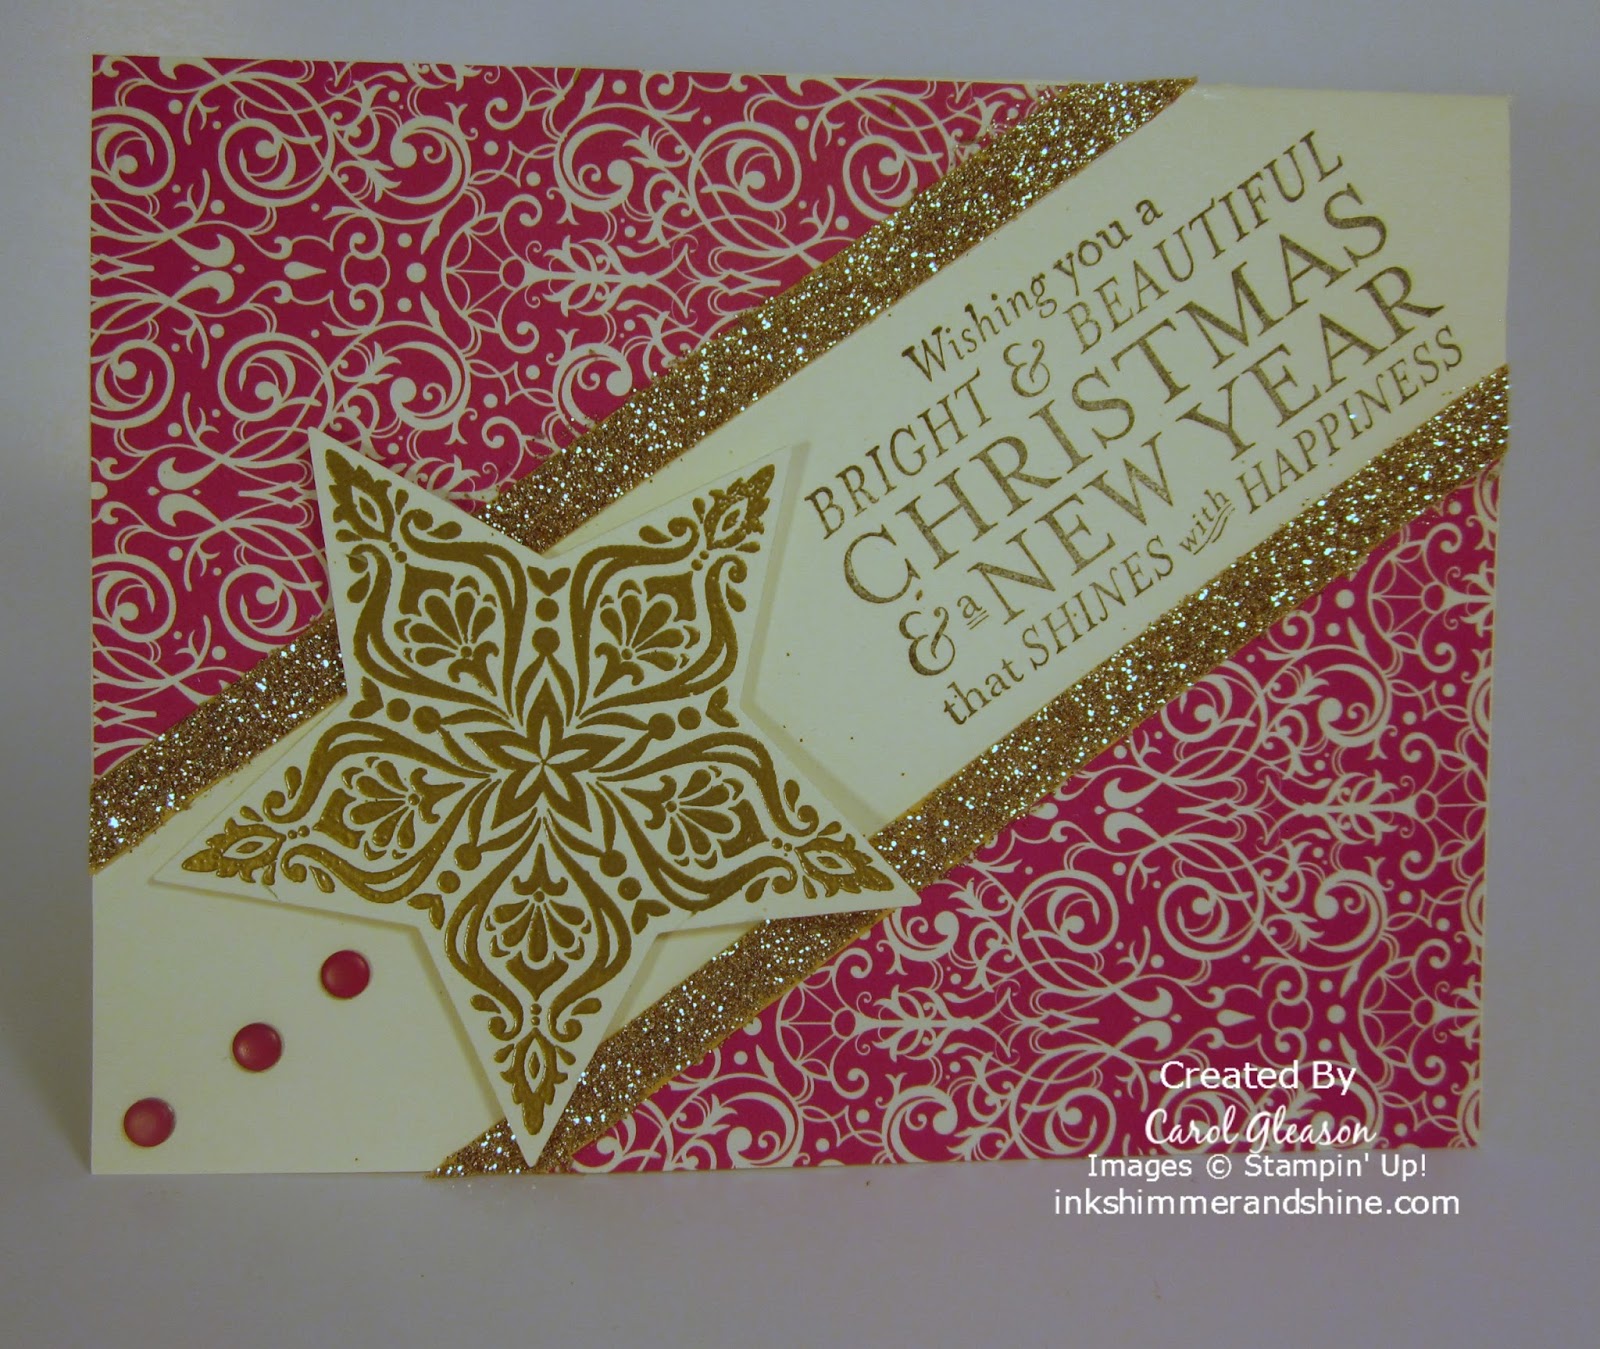
Punches: Modern Label, Merry Mini Punch Pack
Other: 1/2" Pear Pizzazz Seam Binding Ribbon, Silver Glimmer Brad, Silver Glimmer paper, Dimensionals

Card #5


Cardstock: Regal Rose, Whisper White, Certainly Celery
DSP: Holiday Treasures
Stamps: Tags 4 You
Ink: Primrose Petals
Other: 3/8" Primrose Petals Satin Stitched Ribbon, Lacy Brocade embossing folder, Dimensionals

Card #6


Cardstock: Whisper White, Coredinations Primrose Petals
DSP: Holiday Treasures
Stamps: Tags 4 You
Ink: Primrose Petals
Punches: Merry Mini Punch Pack, Label Bracket, 2-3/8" Scallop Circle

Card #7


Cardstock: Whisper White, Coredinations Primrose Petals, Certainly Celery
DSP: Holiday Treasures
Stamps: Jolly Bingo Bits, Good Greetings
Ink: Primrose Petals


Card #8


Cardstock: Whisper White, Regal Rose, Pretty in Pink, Certainly Celery
DSP: Holiday Treasures
Stamps: Good Greetings
Ink: Primrose Petals
Other:  Lovely Lace embossing folder, Always Artichoke Seam Binding Ribbon

Card #9


Cardstock: Whisper White, Always Artichoke, Pretty in Pink, Certainly Celery, Coredinations Primrose Petals
DSP: Holiday Treasures, Chocolate Chip from Neutrals DSP stack
Stamps: Holiday Home, Letterpress Winter, Jolly Bingo Bits
Ink: Primrose Petals, Always Artichoke


Whew! That's it for today. Hope you'll have some time to play with YOUR stamps and paper this week! Happy Stamping!

Tuesday, October 7, 2014

Busy Pattern Paper Challenge

What do you do with paper that has a really strong pattern and lots of colors like this one?


That was the challenge put to the Song Of My Heart Stampers team a few weeks ago. Would you like to see some examples of what they came up with? If not, close your eyes and step away from the computer now, because I'm going to show a few.

How about a card border, or a banner? This card uses lots of white space with only a small border of the paper showing.


Or maybe you'd like a cute Christmas tree? Again, there's lots of white space on this card, and an embossed snowflake adds texture and also offsets the colorful paper pattern.


Another option is to use this paper for a kite pattern on a pretty scrapbook page. This time the Pistachio Pudding paper acts as the backdrop. I love the "Soaring" sentiment on the bottom too!


For my sample, I chose to make a baby card! Baby card? Yes, I think it works. Take a peek and see what you think!

The Confetti Celebration Designer Series Paper was embossed with the Argyle embossing folder and lightly sanded, then added to some Basic Gray card stock on a Pistachio Pudding base. Both the embossing and sanding help soften the pattern. The giraffe from Zoo Babies was stamped in Summer Starfruit and added to the Smoky Slate tag. A little sentiment and some rhinestones, and there you have it - a baby card!

Hope you have enjoyed seeing some of the ways that you can take a strong pattern and break it up so that it doesn't overpower your card, scrapbook page or banner! It's fun seeing how the same product in the hands of different stampers can look totally unique, don't you think?

Happy Stamping!

Carol


Monday, September 22, 2014

Glittered Greetings Paper Pumpkin Cards

Finally, I had a chance to put together some of my past Paper Pumpkin kits! Today I'm sharing a couple of cards using the March 2014 Glittered Greetings kit.

On some I used the wooden elements, and on others, the striped cardstock and the gold glitter dots.


The Season's Greetings card uses a star and strip of silver glimmer paper, a greeting from the Bright & Beautiful stamp set stamped in Melon Mambo ink, the tree from Scentsational Season stamped in Bermuda Bay and another tree cut with the Holiday Collection Framelits from Winter Frost Designer Series paper and popped up with a Stampin' Dimensional.


The Christmas Bliss sentiment is from the Christmas Bliss photopolymer set (love it!) and is also stamped in Melon Mambo. The gold glimmer dots are from the Paper Pumpkin kit. The stars were cut with the star Framelits (large one is Bermuda Bay, small one is whisper white stamped with Versamark using a stamp from the Work of Art stamp set, then heat embossed with Irridescent Ice embossing powder).
 

The third Christmas card also used a star framelit, a snowflake stamped in Coastal
Cabana ink and popped up with a Stampin' Dimensional, gold glimmer dots and a sentiment from the Bright & Beautiful stamp set, stamped in Bermuda Bay ink.

For my last two cards, I used the thank you wooden elements from the Paper Pumpkin kits. On one I added some little kraft stars left over from another project, then stamped a design from Work of Art in Melon Mambo - Simple! On the other I used a Summer Starfruit tag left over from the Everyday Occasions cardmaking kit, and the gold glimmer dots and stamp from the Paper Pumpkin kit, inked in Summer Starfruit. To add a different look to the wooden element, I daubed on Bermuda Bay ink with a sponge dauber.


So I hope you're not as far behind on your Paper Pumpkin kits as I am. But if you are,
go ahead and make them into thank you or holiday-themed cards. Use your imagination - I'd love to see what you have created!
 
Happy Stamping!

Monday, September 1, 2014

Christmas Greetings for the Pals Paper Arts Sketch Challenge - PPA217

Happy Labor day weekend! I love LOOOONNNG weekends, and this weekend is no exception. Having that extra day off from work allows me to do most of the things that 'need' to be done, and still have time to PLAY! I hope you have some time to play this weekend as well.

My grandsons came to visit on Saturday, so it was an extra special weekend. While they were busy playing with some new birthday Lego sets, I pulled out a "few" card-making supplies (the pile of supplies kept growing larger - LOL!)

I had just purchased the 'Happy Holidays' issue of CardMaker magazine too, so I was inspired to start creating some Christmas designs. I really love the colors from the Stampin' Up! Winter Frost Specialty Designer Series Paper (Bermuda Bay, Coastal Cabana, Island Indigo, Pool Party, Smoky Slate & Whisper White), which is sadly retired now.

With all the hustle and bustle of the holidays last year, I didn't have nearly enough time to use it! So what better day to bring it out than PLAY DAY? Here are a couple of cards I created with the Winter Frost color scheme and some pieces from my scrap bin:


Today I decided to continue to play with these colors and incorporate them into a card for the Pals Paper Arts sketch challenge by Nicole Watt. Here is her sketch:
217
This is the card I created using the Stampin' Up! Christmas Bliss photopolymer stamp set. The trees are stamped in Bermuda Bay and embossed with Iridescent Ice embossing powder (sparkly, but hard to see in the photo):


I had a lot of fun playing with this sketch! Won't you play along? You have until tomorrow at noon (CST) to link your creation to the challenge. While you're there, be sure to check out all the other great designs.

Happy Stamping!